
Being A Fashion Student 101: Design & Illustration
This post may contains affiliate links. Read my disclaimer policy here.
You've decided on your project idea and have done an excessive amount of research, now you are ready to design but you don't know where to go from here. Don't worry, I am here to help. In this post, I am going to be talking about how to move forward with your design ideas and key points in how to help you with your illustrations. If you have missed the previous posts from this series, you can read about research and sketchbook, and applying and 1st year tips by clicking on the links.
DESIGN
KNOW WHO YOU ARE DESIGNING FOR
How can you design a collection when you don't know who you're designing for? Think of a muse; age, style, job, hobbies. Just say you're designing a collection for a 23-year-old working in the city at a magazine office, who likes to bring in Parisian street style into her looks. You'll have tailoring as a starting point and can research into the street style to bring in new influences. As she works in the city, you might want to use layering as she will be constantly on the move in a busy place. Even by these little points, you can already see the sort of style and silhouettes your collection will take.
PLANNING YOUR COLLECTIONS
Planning what sort of collection you want can also help you design. Think about whether you want to design for spring/summer or autumn/winter; this will determine what sort of pieces are going to be in your collection. Have a rough plan of what pieces you want in each look so you can think about this while you design. It's ok to reuse a silhouette or detailing you like as this keeps your collection to stay cohesive. You can either change it into a completely different garment (top to a dress), or use this as a starting point and maybe change the scale or placement. Decide if you want your collection to be interchangeable; if you are designing a dress line with jackets, are you able to wear the jackets with any dress in the collection? This is also where your muse comes in, does she like to mix different pieces from different designers, or does she like to stick to a certain style?
CHOOSING YOUR FABRICS
I'm going to talk more about this point in the next post, but knowing what fabrics you want to use can help bring together your collection. If you have no idea what sort of pieces you want, visit a fabric shop and pull out the different fabric you like. You can sometimes just see and feel a fabric and know this is perfect for a jacket or a trouser. If you know you want to do a draped piece, hold the fabric out and see how well it drapes. There is so much inspiration you can get in a fabric shop, so even if you aren't sure what you want, still go and have a look.
WEARABILITY
When I was designing at a much younger age, I was always aiming to create something different and very out there. As I got older I started to realise that no-one would actually wear them, unless you're Lady Gaga. If your niche is to design these sorts of pieces then that's completely fine, that's the route you want to take, but if you want to sell your designs in a more 'ready to wear' concept, you need to think how wearable your designs are. Think about how easy it would be to wear and move in the garments, your fabric choices can also determine this.
I'm learning how to use my ideas to design and illustrate a collection with @helloaycan #fashionstudents
WORKING OFF THE STAND
If you sometimes struggle in coming up with designs, you can work straight off the stand. I always find it easier to cut and sew the basic block and work from there. Depending on your initial research and ideas, you can use this to help focus your designs; if you're wanting to drape, pin your chosen fabric to the block and see how it drapes. Cut into your basic block and see how adding more fabric creates volume. If you find it easier to manipulate, use paper and transfer this to fabric once you are happy with it. A piece of advice I am going to share with you, make sure you pin your fabric to your basic block, not the stand as it's harder to get off... I learnt this the hard way. There is no right or wrong way to design, find which way you're most creative at and design away.
PHOTOGRAPH YOUR DEVELOPMENT
This is not only vital for your sketchbook and portfolio to show the development of your garments, but it can help you with the early stages of designing. Like I mentioned above with working straight from the stand, once you have photographed these, you can print them out and sketch over the top. Maybe highlight certain lines or shapes you have created. You can even use photo editing software to manipulate your images and see a new way of looking at an initial idea. The great part of starting a collection is there is no limitations when it comes to designing.
SAMPLING DETAILS & FABRICATION
Again, I'll talk more about toiling in my next post, but if you have a certain pocket detail or fabric manipulation you want to use, sample it and then pin this onto your working silhouette. This makes it easier for you so you can move it around and change the scale without having to redo the entire silhouette. Choosing to have a pocket in a certain place can determine how the rest of your garment works, so it's best to decide this as you're designing.
COLOUR PALETTE
Your colour story is usually based around your research; finding an image that is inspirational and pulling colours out. If you're trying to create a mood with your collection or basing it on a theme or decade, this might also determine your colour palette. You can pick to do your entire collection one colour (which creates a striking look), have each look a different colour, or just mix the colours around. I always found it easier to scan my designs onto the computer and use Photoshop to drop colours in and see how they work together, it makes it much easier to change your ideas around too. As I mentioned above, if you're planning to have your collection with interchangeable pieces, the way you use your colour will determine how well these looks come together. It's better to pick a few main colours as well as highlight colours (for trims and small details) instead of using the whole spectrum.
ILLUSTRATIONS
WORKING DRAWINGS VS ILLUSTRATIONS
Knowing the difference between the two can really help determine the style you want to use. Working drawings are really for sketchbooks. They're a quick way just to get all your design ideas down; they can be pretty basic and worked over the top of a template. These drawings are really important as you have to be pretty literal with your designs so you can see the silhouettes and lines clearly, enabling you to get the most out of your drawing so you're able to pattern cut. Illustrations or final illustrations are a way for you to be creative and show off your personal style. You can mix different media, really stylise the silhouette, and add shoes and accessories; this really shows off your designs.
LEARN YOUR PROPORTIONS
Once you learn the proportions of the body, drawing the figure becomes pretty simple (I say pretty simple, it's still a struggle for me). "9 Heads: A Guide to Drawing Fashion" by Nancy Riegelman is a book I strongly recommend. It takes you through step by step on how to draw the croquis, as well as different figures, drawing clothes on the figures, and adding details. If you have any opportunities to take part in life drawing, this will really help with your proportions. Having to draw the nude figure makes you concentrate and realise how proportions relate to different parts of the body.
CREATE A TEMPLATE
For your sketchbooks as you'll be designing hundreds and hundreds, you need something to help you keep your designs constant and proportional, using a template is the best way to do this. Don't get worried about your figures looking 'samey', you can go into more detail with your chosen favourites. You can also customise your template so there is a little bit of you in the design. If you are struggling with templates, try using fashionary. They are tailor made sketchbooks for fashion designers, with the book split into 20% dictionary and 80% figure templates. Yes figure templates. The figures are sketched out lightly so you can just draw straight over the top of them. If you want to find out more, I reviewed a selection of their sketchbooks here so take a look.
MEDIA
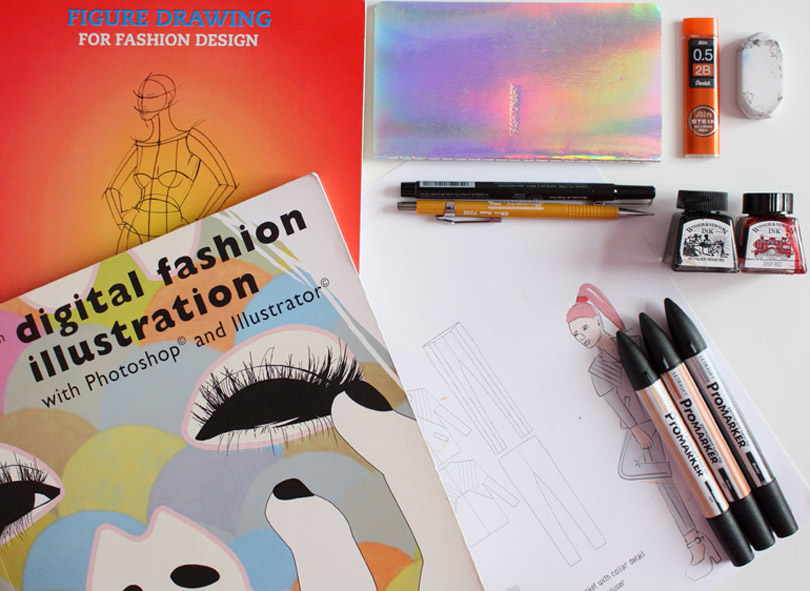
When it comes to your illustrations, there is no limitations on the media you can use. For working drawings (mainly in your sketchbook), I prefer to keep it quite simple and either draw it out with a fine liner, or to bring in colour, use Promarkers. Promarkers are such a great way to change your quick design to a working drawing, they might seem a bit expensive, but picking a few colours you need for that project will work wonders. When you've chosen your final designs and are producing your final illustrations, this is a chance to be more creative. Using ink or watercolours can bring your designs to life. The theme of your project can help you create a mood with your illustrations too. With something based around sea life creatures, you might want to use more watercolours to really bring out the effect of water, or for something based on stained glass windows, you might want to use ink as they're quite pigmented and will bring out the shine from the windows.
EXPERIMENT
I have mentioned above about the types of media you can use, but don't limit yourself to a few, or to what you are use to... really experiment. Photocopy a sketch of your designs and work over the top of them, and you don't need to worry if something doesn't go right as you can just photocopy more. Try different media, mix unconventional mediums together. If you struggle with drawing by hand, start by drawing your basic design, scan it into the computer and edit away. If you find it hard to use a mouse, you can make an investment into buying a graphics tablet. They aren't too expensive and they come with a pen so you can draw straight onto the computer. "Digital Fashion Illustration with Photoshop and Illustrator" by Kevin Tallon is a great source for inspiration. It shows various examples of different styles of illustrations, as well as a step by step guide to creating your own. When you really start to experiment, you'll discover your niche.
PRACTISE MAKES PERFECT
This is the part of designing that I am always struggling with, but I soon hope practice will make perfect, well I'm not aiming for perfect just yet. Just keep practising, get a small sketchbook and just keep drawing. Things you might see as a flaw in your drawings can sometimes even be the added characteristic that makes your drawing personal and favoured by others.
If you have just started 1st year or you are in another year, I really hope this post has helped. If there is anything else you want to know and think I can help, comment below, tweet or e-mail me, (links below or above) I would really love to help. Make sure you're following so you won't miss out on the next part of this series.


LEAVE A COMMENT BELOW
and let me know your thoughts on this post!